Showing posts with label Warhammer 40k. Show all posts

Sunday, May 3, 2020

RT-era Leman Russ WIPs

I've been trying to keep myself motivated in paint world by finishing up something that's been on my table for a while. It is good  justification to paint or work on something new afterward. Also, I crashed hard and I forsee at least another week of no-go-hard. What do they say? Ride like lightning. Crash like thunder. Well, I did it again, man, and it makes me feel like I'm getting old.

This time back on the bench is a pretty rare Leman Russ mini. I picked up duder years ago, NOS in package with his wolves and backpack. Way stoked to dig into a piece of mint classic lead to make it unique. The axe is a conversion from an old reaper weapons pack, with a plastic wolf tail stuck on. Cork rocks, and a piece of plaster carved to look like a rune stone.


Russ came with a special wolf backpack with a cape, a pelt, and a banner pole. Hat trick. I bet it is probably the valuable piece of the mini in lead-head land. I love me some heraldry and intense nerd flags, so enjoy some doodles from my sketch book.

A pretty solid idea of where I'd like go with the Russ banner. I must have been deep in a Despise You kick at this point. Just kidding. I'm always on a DxYx kick. 

I am going to try to bring in some of that first Chapter Approved style with his banner. Some reference pictures from a copy of that very tome. Pretty cool, huh?


Until next time, keep the rubber side down and do as I say, not as I do. That's pretty solid advice right there given my current condition. 

Monday, August 18, 2014

RT Challenge/Clipping and Pinning Tutorial

Sorry dudes. It's been summertime. Lots of biking and skating, and copious quantities of beer has been quaffed. My ankle feels better, and the weather has been nice, hence time around the workbench has been a little scarce.

What have I been up to? Awesome. That's what I've been up to. This was a good day.

Alright, in this post I have some stuff regarding the Rogue Trader Mini Exchange I proposed months ago, and I wrote you up a little tutorial. It's nothing too advanced, but it shows my method to take care of "slotta-style" tabs on your miniatures, so you can pin them to a custom base. Hopefully it will come in handy for some of you.

To the cats who dedicated to the mini exchange, they are all ready to be shipped out, and as always, I apologize for my slacker ass. You're getting free miniatures. You really can't complain too much.

So I ended up picking out an ork, a 40k beastman, and a rare Leman Russ mini. Here are two of 'em all prepped, pinned, and on their completed bases. At this point in the space-time continuum they are primed as well. I converted the Russ mini a bit by pinning on an axe from a Reaper weapons pack, and the wolf tail is from the old Space Wolves sprue. Blasphemy! Sacrilege! You may declare that converting a rare and classic Leman Russ is complete and utter bullshit, but I don't care. I think he was supposed to be holding reins for his pet wolves in his right hand, but I always thought the pose was a bit awkward.

I've always dug this beastman miniature, and I haven't seen any well painted versions of him. I think it is interesting he is wearing loyalist armour and wielding a plasma pistol. Pretty cool. I believe in the olden days of Rogue Trader the beastmen were considered a sub-race of humanity, rather than the spawn of chaos. I'm probably still going to paint him up as a chaos follower, 'cause I feel it's only proper. I'm thinking Khorne.

In case you wonder why my workbench is covered in blue, purple, and magenta metalflake, it's from a board I airbrushed up years ago.


Here are my completed bases for duders. I'm going to try to write up a tutorial on the creation of the slab bases at some point. They involve casting thin sheets of plaster, then breaking them up and carving them. The graffiti base has been completed and kicking around in the stash for years, and I think the ork will finally make an appropriate addition to it. The round wooden base in the middle is from a liquor bottle stopper, and the square one on the right is from a children's wooden block set. The rocks were all made from wine cork, and there are a few miscellaneous odds and ends thrown in from the scrap boxes.


Here is the detail of the base for Russ. As you can see, it's made of a carved slab of plaster, stacks of cork, and a wolf skull from Logan Grimnar. There is some putty on the inside to solidify everything and to allow the pins on the miniature's feet to grab on to something. Note the two holes drilled for the pins.


Anyways, on to the useful bits.

I'm sure many of you have your own style or technique for removing the tabs from miniatures, but I figured I'd let you in on my method. It's all well and good to glue your minis directly into a slotta-base (personally, I prefer the Privateer Press style) and putty around the gaps, but nothing really sets off a mini like an impressive scenic base. Unfortunately, to get that mini on that base you're gonna have to cut that annoying tab off and put some pins through the feet.


Cue "Tools of the Trade" by Carcass. Also, check the ork.
 
So you can always just saw directly across the tab, however find that to be a massive pain in the ass, and kinda messy. It generates lots of gnarly lead dust in the air, I find it isn't very accurate, and it requires more cleanup and filing than this method.

First step is to saw vertically through the middle of the tab. Careful, don't emasculate the man. The reason I do this is so after the tab hab been sawed, you can carefully grab under the foot with pliers and bend the two sides of the tab in opposite directions with your clippers. I know this seems unneccesary, but the narrow space caused by the saw doesn't leave enough room to properly clip the tab off without distortion, and if you go all in and just try to clip the tab down the center it is going to bend, or possibly break, the lower extremities of your miniature. This beastman had particularly fragile legs, but marines are usually a little more durable.


Now you can simply trim the tab off until it looks something like the picture on the right.


Now we grab that razor saw once more and we saw off the remaining little chunks.


Then simply file his feet (or in this case, cleft hooves) flat.
 
 
My pin vice came with a needle sharp punch, which I find excellent for marking where your pin is going to go. You can also use a sewing pin or needle. I discourage the use of the tip of your hobby blade for this, it's easy to slip and injure yourself. It is also possible for the tip of the blade to snap off in the foot, and the tiniest little fragment of hardened steel is going to completely botch your attempt to drill that hole. That being said, it is important to make an indent where you want to drill, 'cause otherwise the bit wont have a proper seat, and it can walk all over the place. Frustrating.

 
Then drill. Carefully. I used the smallest drill bit and thinnest brass wire I have to pin this mini. Sorry I failed on taking pictures of the wire and finishing steps. Hopefully you should be able to manage from here.


If the mini I am pinning has large enough feet/legs, I'll use a thicker piece of wire for one foot, and a very thin piece for the other. Observe the ork in the first picture of this tutorial. His left foot has a thicker wire than the right foot. This allows you to drill two large holes, and the large wire will anchor the miniature while the thinner one allows easier placement.

Alright guys, take it easy, and I will return soon. I'll be slinging paint on these bad boys, and I have a music article in the works as well. 'Til next time, and let's hope it isn't another two months!

Wednesday, June 4, 2014

Rogue Trader Mini Exchange


So I've been trying to cut down the lead hoard a little bit these days. Blasphemy, I know. Remember, a miniature painter only dies when his last figure is painted. I. Will. Live. Forever. That being said, I've got a stupid stash of rad stuff, and I want to see it go to good use. My last post was pictures of some old school 40k stuff I did years ago, I got some good feedback, and it really got me to thinking.

I'd like to present a challenge. Maybe it's not really a challenge, it's more of just an offer. I have a major boner for old Rogue Trader stuff done in a modern style, and I have a large collection of classic Ork and Space Marine miniatures. I'll toss serious cats a mini from my collection if you paint it up and send me pictures. Postage is on me. I just want to see you sling some wicked paint. I would prefer to see some reference pictures of your stuff (i.e. I'd like evidence to prove you're not gonna be flipping this shit on the EvilBay), but all skill levels are welcome. I want to trust you guys, but sorry, I don't wanna see my collection weased for someone else's gain. I could sell this shit myself. Don't do it. I will track you down. I will hurt you. That is a promise.

Seriously, that's a drop in the bucket of my hoard. That's predominantly RT Orks and Marines.

So on an old school kick, I decided I should share some of the weirder and rarer stuff in my collection, and I snagged a few more pictures of some way old stuff I painted. I know there is more stuff kicking around here and there, but this is all I was motivated to find while drinking cheap beer at 3 a.m.


I still remember finding my copy of Rogue Trader when I was 18 years old, getting blazed outta my gourd, and flipping through that holy tome. So much killer art, so much weird. The Book of the Astronomican has some wicked artwork, and a huge catalog of painted RT goodness at the end. Somehow there are two copies of the book crammed between that cover. Weird. I still need to get a few pages framed to hang around the pad.
 
Bolt Thrower's Realm of Chaos on vinyl? Better believe I have that shit framed. Yeah. I know you want it. Ain't leavin' my collection. Absolutely amazing artwork. Gatefold. You need to see it all. I'll do up a whole article about it eventually. I still remember the first time I found a Bolt Thrower album. Again, I think I was 18, and it was Honor Valor Pride. I saw the 40k inspired album cover and I was hooked. Can I just say how awesome early Earache Records was? Like when Carcass appeared on Red Dwarf? Worlds collide.
 

Ratspike and an early Fantasy Miniatures book. Blanche and Miller. So stoked to find those both. I found them at a convention a few years ago, and I scored both for cheap. I assume if you are reading this you know of the genius that is Blanche, but if not, he's one of the primary creative forces behind the evolution of the dark and moody feeling of the Warhammer worlds. He's kind of a big deal.


 I will say my tastes have changed over the years, and I don't really have the urge to paint up any more Space Marines. I've done too many. Sorry, dudes. That being said, I've always been a fan of Space Wolves. Vikings in space? Bring it. I had almost a full squad of these guys painted at one point, but as I said in my last post, some disappeared over time. I particularly love devil lock plasma gunner. His shoulder pad declares his name is Sven, but I really should have named him Glenn. I wasn't so clever in my youth.


I've painted two versions of the Imperial Fist dude. One was originally in the Wolves squad, and he departed into the void. I kept the Fist because painting yellow sucks. Especially clean and precise black lined yellow. I don't know how I had the patience to do that shit back in the day.

So here is a little rant for you. One of the beautiful things about early 40k is the shameless ripping off of all that was good in sci-fi and fantasy at the time. Like Star Wars mixed with Tolkien with a little flavor of B-movies and punk rock, and some history in there as well. It's really unfortunate Games Workshop has come down to what it is these days. Bitch, bitch, bitch. We all know they are now an evil empire, but they still occasionally put out a good kit. I still need to snag the new Knight Titan. That being said, why GW, why? You've abandoned pewter. It hurts my soul. I know GW being huge dickholes is a big point of consternation in the miniatures community these days, so I'm gonna let it go at that. Trust me, I could go on.

Getting back on track, anyone who legitimately want to wreck some old school style will have a classic 40k mini shipped to them. You can suggest what you want, but I'll pick it. Obviously there's gotta be a limit, so if this gets too popular I'll have to bail on some people. Heh, that is assuming people actually read this blog. Post in the comments section if you're interested, and if possible, leave a link with some of your work. I'll email you for details. You can also try using that nifty little contact box I added on the right hand side of the page. I'd like to see them done in a month or so. Shoot me some pictures back. Lets bring it. Drink beers. Break out the Bolt Thrower. Let us show how old school minis can still hang.

Monday, June 2, 2014

Some older stuff I've done

 Recently I discovered my Cool Mini or Not account was shut down, which was kinda a major bummer. I had my account running since 2003, and there were many pictures of miniatures that are now lost into the void. A couple moves across the country, and some of my prime pieces have disappeared. It's cool. They all went to good friends and people that deserved them. I decided to snap some shots of my favorite minis that are still kickin' around.

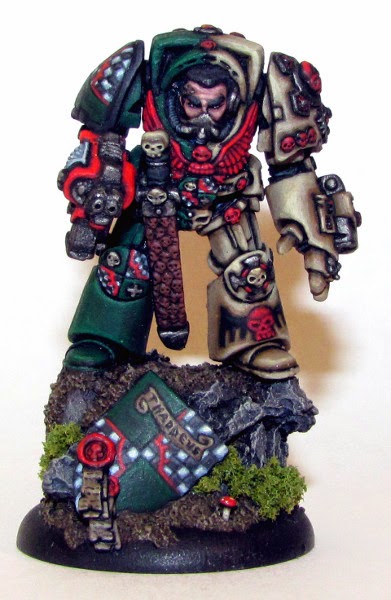
I painted this cat around 2007 or '08. Thaddeus, the Angels of Redemption Captain. I went through a big heraldry phase for a while, and I've always been a fan of classic '80s and early '90's Space Marines. I won a gold medal with him at some show or another. It was given to one of my best buddies, and fortunately I still have access to take pics of him.


This guy is one of my favorites. It isn't technically impressive, but damn, is he a badass. This must have been '05 or '06. I did a series of minis based off of Fallout/post-apocalyptic fiction and movies. I think he was from Foundry.

Once more some classic Space Marine heraldry. This guy also won me a medal, silver I believe. So smooth. I don't know how I did that shit. Well, I do, but I doubt I could swing it again. '06 or '07.
 
 
Another post-apocalyptic style guy. From Privateer press. Again, this belongs to my buddy.


That's it for today, just wanted to show some stuff off. I'm hoping to have another post this week about a new 7" I picked up recently. Later.

Saturday, November 23, 2013

A current shot of the desk

So I thought I'd show you guys a shot of my current projects. I've actually been blasting out a fairly decent amount of work recently. I'm trying to clear out some old projects before continuing more recent work.
 
You may recognize that evil little goblin bastard back there. Gorefink is almost done. I have to paint his hand and weapon, and do some touch ups here and there. There will also be a sign nailed to the stump with his name on it. I'm pretty stoked to get him done for show season.

There's a Rackham dwarf chillin' with his rifle there on the right. He was meant to be a fun and quick little paint, but unfortunately I got distracted and started doing a nice job on him. I absolutely love the old Rackham dwarves and goblins. Check out Haekel & Jaeckel for some nice Rackham pictures and tutorials. It's in French, so give that translator a workout! It's worth it!

The  marines... well... they are Space Marines. I just need to finish them and get them out of my world. That being said, the Space Wolf on the left is one of my favorite miniatures ever. The first miniature I painted that I was really proud of was this dude. I'll have side by side pics of new vs. old when he's done.

Other than that, I've been working on a new toy. Pretty stoked. Surly 1x1, dedicated singlespeed trail ripper. Just got her finished up the other day. This bike was mostly funded by selling shitty death metal on ebay. Shred!


I'll get something interesting posted up for you guys soon, perhaps a little tutorial or something. Maybe I'll learn you cats my method for building wilderness bases.

Thursday, August 29, 2013

A little destruction!

I mean, this blog is called Paint and Destroy. It had to happen at some point. I'm going to show you how to lay down some battle damage on a Warhammer 40k Dreadnought arm and build a sweet display base. This is a really useful technique to practice, it adds some really cool visual interest to large armored areas, and it is useful for pretty much any type of modeling you do.


So first off we are going to assemble our supplies. There are definitely more pieces that make their way into this little adventure, but this is where I started. By the way, wooden liquor bottle caps make awesome display bases. Even if you don't drink, bother your friends who do to save these bad boys for you. That piece on the left that becomes the interior detail is actually part of a Space Marine missle launcher backpack.


This shows how I cut out the panel for the damage. Pretty simple. Drill a bunch of holes, carve that shit out with your knife.
 
 
Now it gets fun. Scrape and carve the hole so it looks like a blast. It isn't shown, but I recommend carving away the interior edges as well. If I had my Dremel, I would have thinned the entire damaged panel from behind. Thinning it makes it look more realistic, and helps with fit.


Here it is starting to look like something. The next step is to trim that backpack down to just the piece I need. I'll spare you from pictures of that. I'm pretty certain you probably know how to use a razor saw. I will warn you, getting the internal piece to properly fit can be a real pain in the ass. It is going to take a lot of trimming, filing, and cursing. If I were building a whole Dread, I would have thinned the back of the interior piece with a file or sandpaper.


This next step is where things get really cool. Get out your thin wire or solder. If not, head down to Radio Shack and pick some up. I used wire here, but I have .015" gauge solder and its about the same size. During this stage I started gluing and realized my super glue had gone bad and was not curing properly, so this whole step was far more infuriating than it should have been. You should just be able to dip the wire in a drop of glue, place it where it should go, wait a minute for it to cure, then bend it into shape.

Yeah buddy!


So you know how I go on and on about trimming and fitting? This is why. Again, I'm not building the entire model, so I'm not exactly worried, but be warned. Remember to always dry fit, check your work, take your time, and prep, prep, prep!
 
Here we begin work on the base. Peel the paper label off the top, then scratch it up with your knife to give it some tooth. Remember how I complained about my super glue not curing properly? That is why the battle damage is all white and crusty looking. Oh well. I did realize I went a little berzerk with the razor saw and messed up those little boxes on the back of the arm. We will get to that shortly.
Here is another quick little trick in case you are unaware. Drill a little hole with the smallest bit you have, then use the tip of your blade to scrape the edges. Easy and quick bullet holes.


Buy these.

Now I have to repair the back of the arm. First I saw it off and sand it down with my Squadron sanding sticks. Buy these. They are awesome. The next step is to lay down a thin line of super glue over all the seams. I tried to show you this in the second picture. Then sand this down with your fine sanding stick or paper. Repeat, possibly several more times. Super glue works great for filling seams that putty would be overkill for. Your fingernail works best for checking if the seams are smooth.
 
Next we head into the stash! Find something cool, trim it down, and glue it on. Easy.


I skipped a few steps here. Find something cool for a little more visual interest. I dug through my hoard for like an hour before I found this eagle from a banner pole. I dropped something else and found this guy laying under my desk. Go figure. Glue everything down, then mix up your putty of choice and cover that base! I prefer superfine white Milliput for groundwork. I find it has a better texture for PVA glue to adhere to. Also at some point I sculpted a skull on the fist, cause you know, it is Warhammer. Cue Misfits. "WE NEED MORE SKULLS!" I use model railroad ballast for basing, and I always mix my PVA glue with water when I'm gluing it down. The glue will soak through the ballast and hold better.
 
 
Success! Prime that shit and get painting!
 
I haven't quite decided if I want to sculpt something on that unblemished panel, or just rough it up some, so priming will have to wait. I'm currently working on getting the figure for this base into shape as well, and he requires a little more sculpting. I'm going to leave this guy as a suprise for now.
 By the way, pick up those sanding sticks at http://www.squadron.com/. It is an awesome hobby store with some really great hobby supplies. If you have never used Milliput, I'd definitely recommend snagging some of it up as well.

I hope you guys found this post useful. I received a request to see some skate decks, so I'll be on that soon. There will be a special guest appearance by my boy, Todd "Sharkbait" Williams, and some decks he painted up for a show.

Party on!